CHECK OUT THE ADONIS NP
SAMPLE CONTENT
GET YOUR INSPIRATION
Explore the content we have prepared to help you discover and get to know the endless possibilities in ADONIS.
Our sample content will give you an introduction into what you can do, as well as where ADONIS can support you.
You can access all sample content in your ADONIS model explorer.

1. Click on “Find” in the top bar
to access your model explorer.

2. Expand the ADOmoney Bank
subfolder “01 Processes”.

3. Open the process map at the
bottom of the directory.
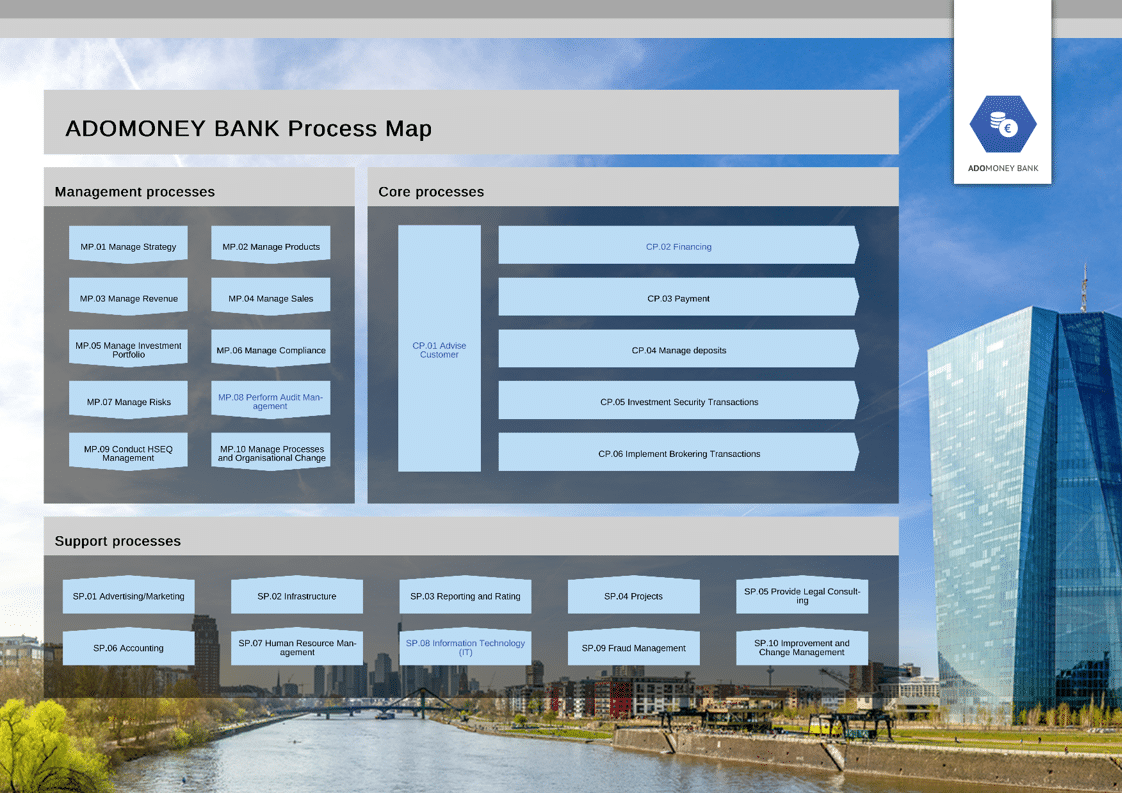
THE ADOMONEY BANK PROCESS MAP
The process map provides an overview of all management processes, core processes
and support processes of the bank. By clicking on a hyperlink in a process, you
drill down to the next level of detail.
Step 1: Open the model explorer. Step 2: Expand the group (folder) “ADOmoney Bank” as well as the group “01 Processes”. Step 3: Double-click on model “Process Map ADOmoney Bank”.
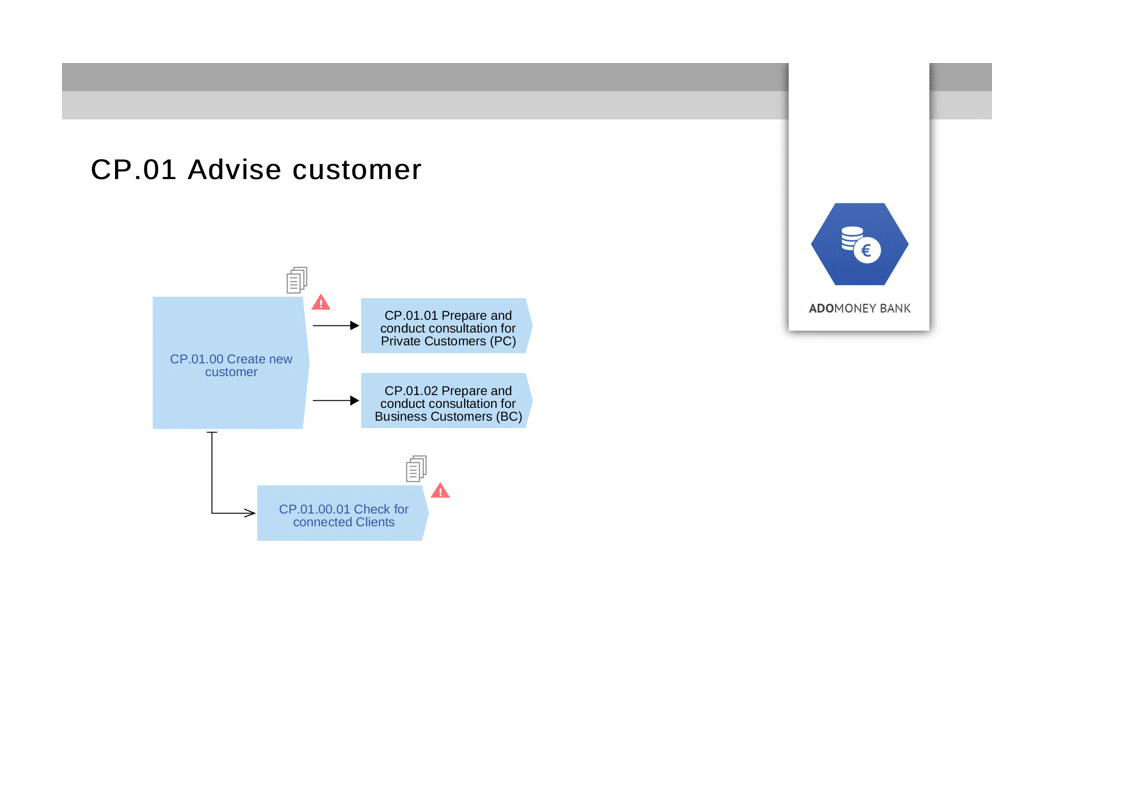
FURTHER LEVELS OF THE PROCESS MAP
Additional levels of the process map allow a better structuring of the processes. Typically, the second level represents a value-chain, structured by dimensions or determinants, such as product groups and lifecycles.
Step 1: Within the model “Process Map ADOmoney Bank” click with the left mouse button
on the hyperlink in the process “CP.01 Advise customer” to drill-down to the next level of the process landscape.
Alternatively: Search for the model “CP.01 Advise customer” in the model explorer.
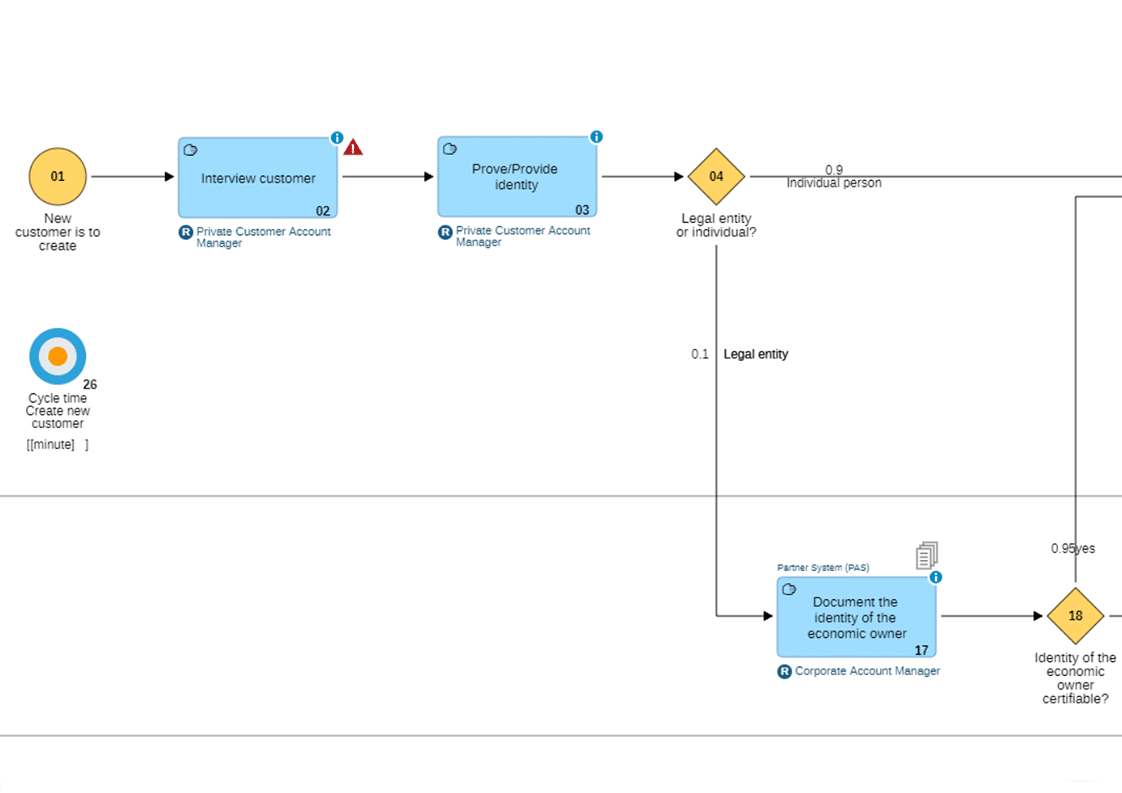
ALL DETAILS IN THE PROCESS MODEL
Drilling down further, the Business Process diagram “Create new customer” provides a very detailed look at the sequence of tasks and all alternative paths. Furthermore, complementary information, such as RACI, systems used, associated risks and more provide a thorough view on the process.
Step 1: Click on the hyperlink of the process element “Create new customer” on the second level of the Process Map to drill down.
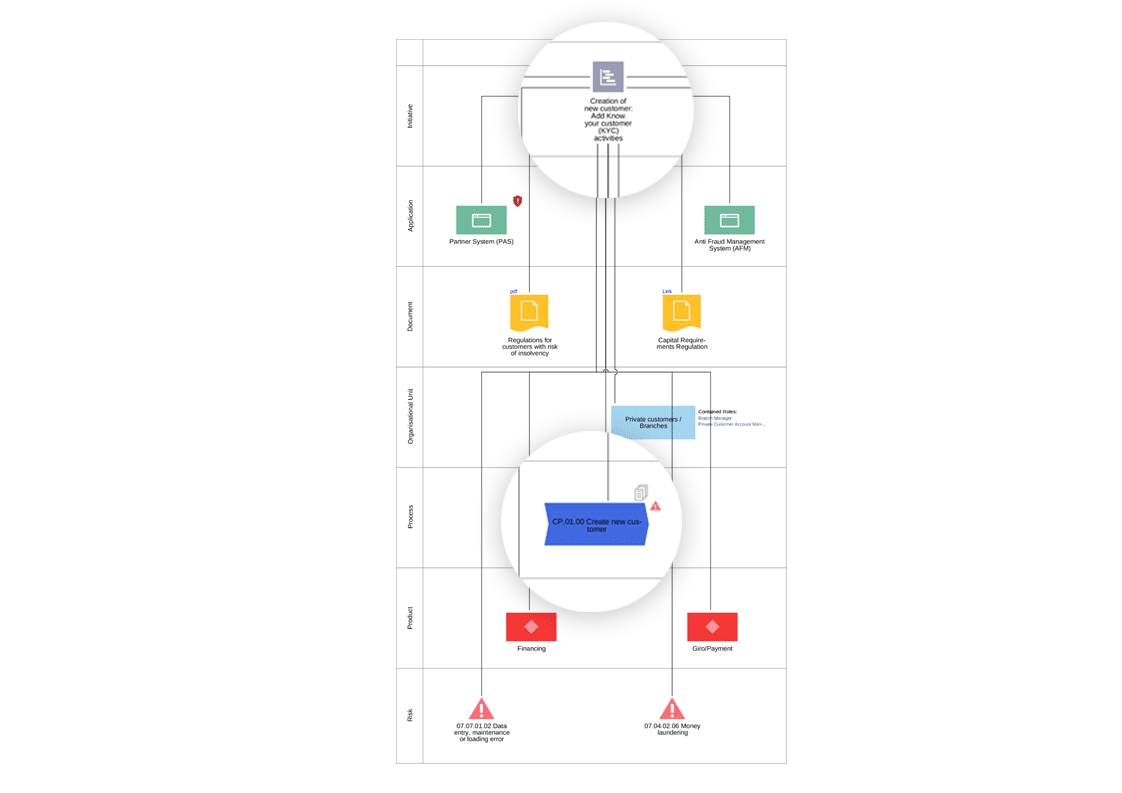
THE BUSINESS IMPACT ANALYSIS VIEW
A Business Impact analysis shows the effects of the “Know Your Customer” initiative on the ADOmoney Bank’s corporate artifacts. Affected process: “Create new customer”
Step 1: Open the object explorer and type the initials “KYC” into the explorer search bar. Step 2: Click with the right mouse button on the initiative “Creation of new customer: Add Know your customer (KYC) activities” Step 3: In the context menu select “Reports“ and then “BIA…”.
Step 4: Select “Initiative impact analysis”.
Hint: You can remove empty swimlanes in the BIA by selecting them and pressing the key “Del“ or via the context menu.

DRILL-DOWN TO SEQUENCE FLOW LEVEL
The process hierarchy can be followed down to the sequence flow level. On that level, the Process Owner can be identified easily.
Step 1: In the process map “CP.01 Advise customer” click with the left mouse button on the process “CP.01.00 Create new customer” to open the detailed business process diagram.
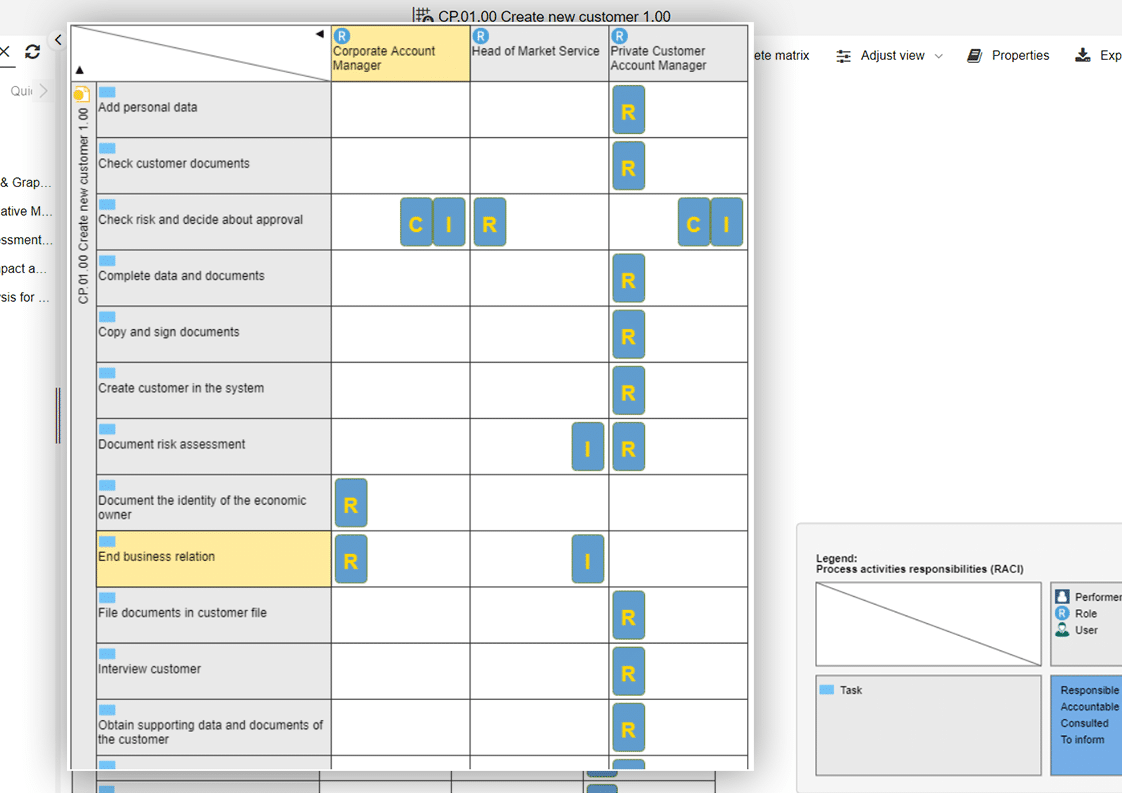
DETAILED LOOK AT INVOLVED ROLES VIA RACI MATRIX
Another way to show all involved roles in a process and their responsibilities is by creating a RACI matrix.
Step 1: In the model “CP.01.00 Create new customer” use the context menu “More” with the three dots on the upper right-hand corner of the screen. Step 2: Select the option “Create view” and then “Matrix”. Step 3: Select the configuration “Process activities responsibilities (RACI)”.
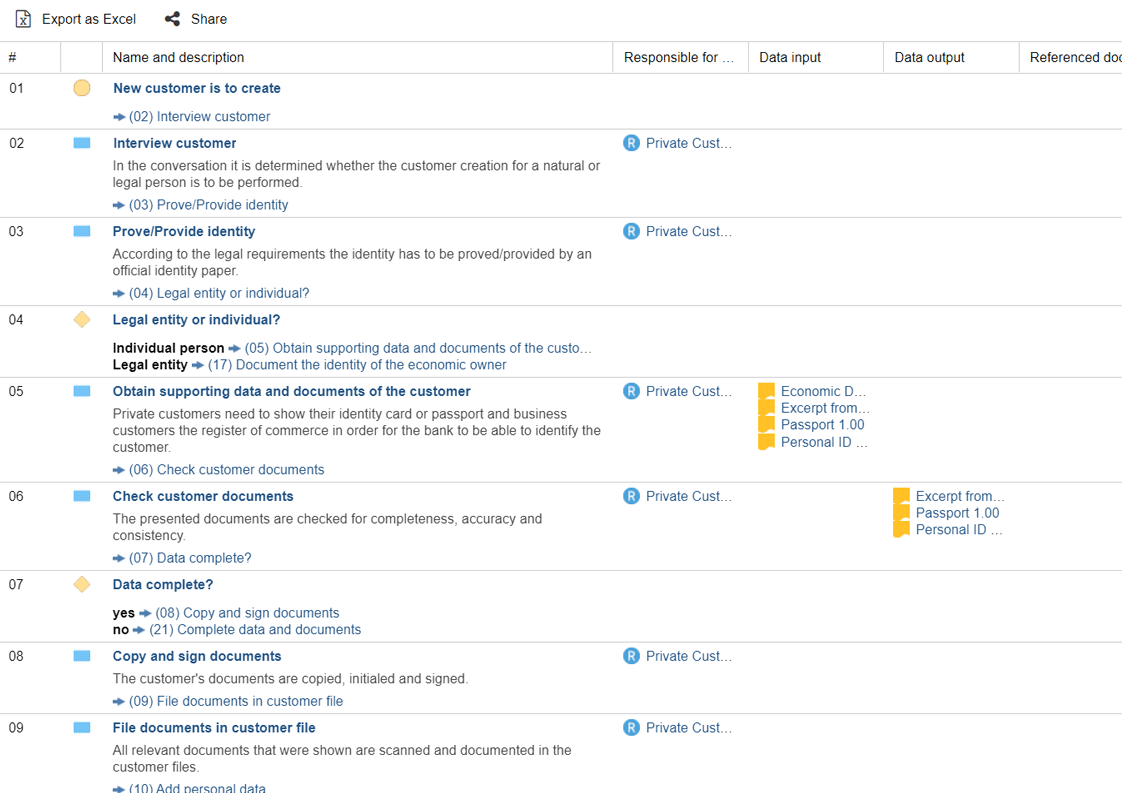
READ THE PROCESS LIKE A BOOK
The innovative textual view provides a nice alternative to the graphical flow chart. It reads like a book and conveys the descriptions for all Tasks as well as responsibilities and needed resources such as documents and IT applications.
Step 1: In the model “CP.01.00 Create new customer” change the view in the upper right-hand corner menu from “Model” to “Text”.
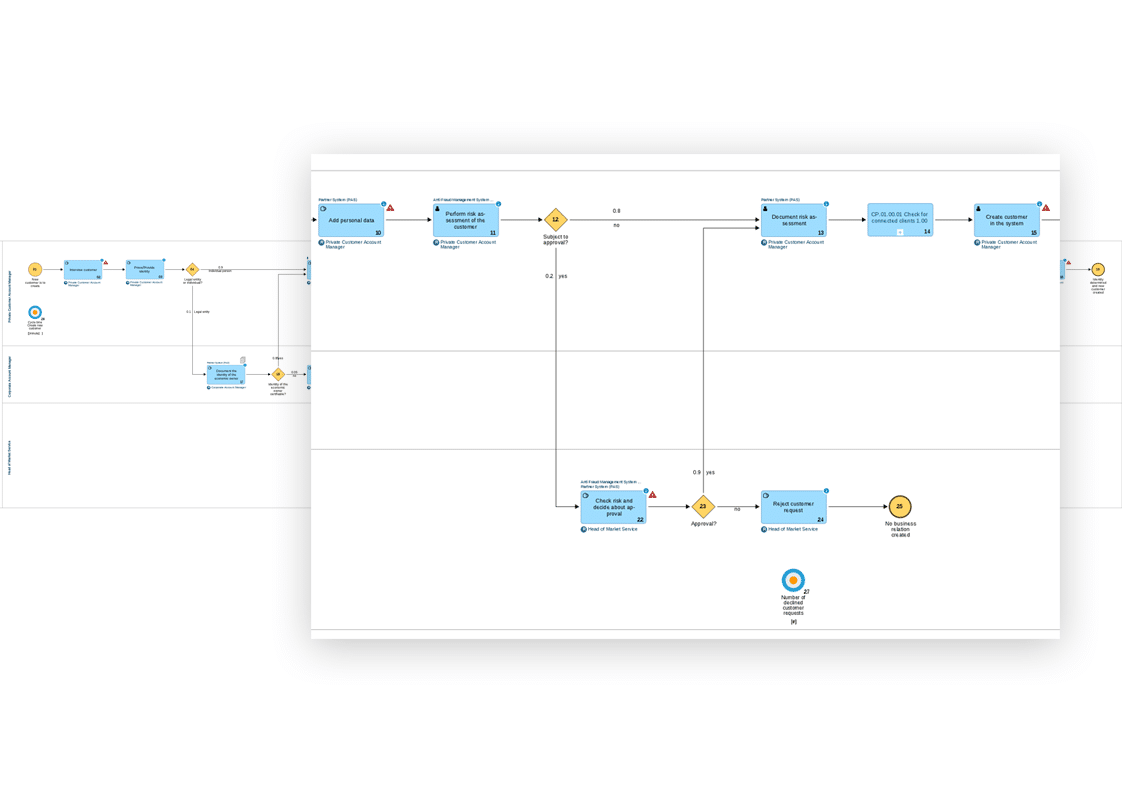
ANALYSE THE SEQUENCE FLOW
Before adapting the process as a whole, an overview of the nature of the process can be quickly obtained by taking a look at the sequence flow.
Step 1: In the model “CP.01.00 Create new customer” change back to the view in the upper right-hand corner menu from “Text” to “Model”. Step 2: Browse through the model and explore it, using the scroll bars or the Navigator (small window for navigation and zoom).
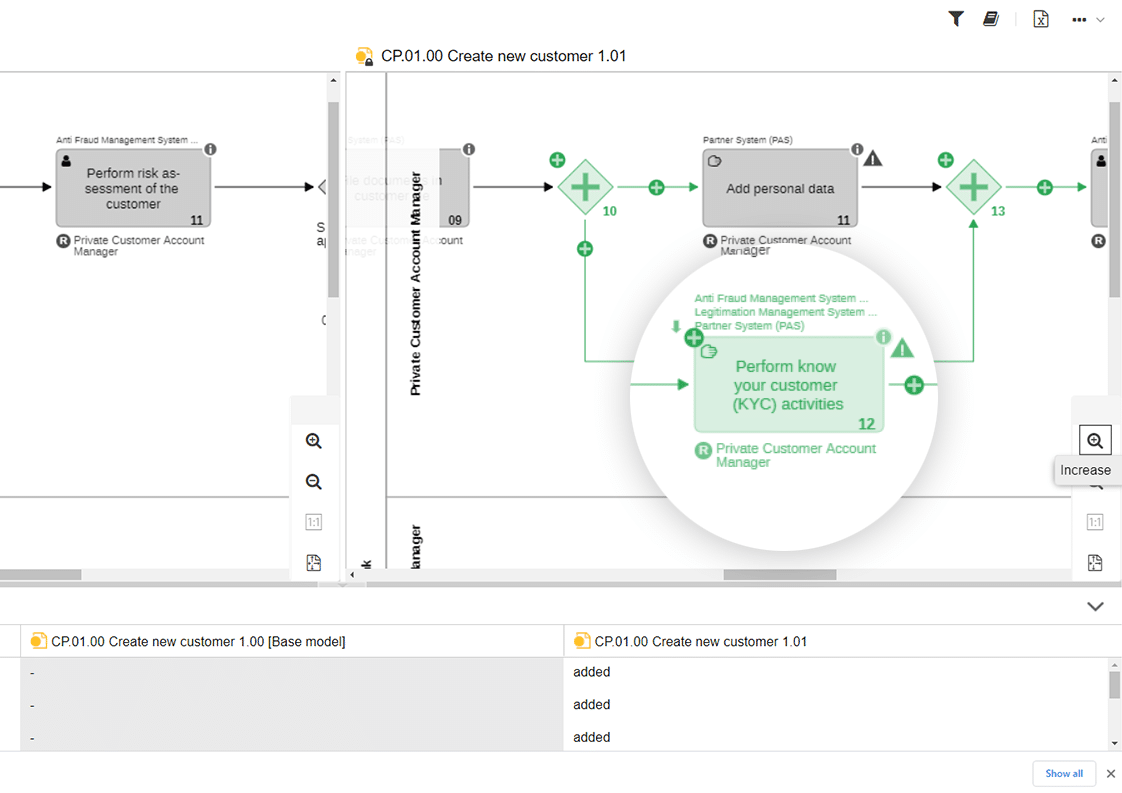
ADAPT THE SEQUENCE FLOW AND VISUALIZE THE CHANGE
After creating a new version / copy of the model, the “Create new customer” process is expanded according to the “Know Your Customer” initiative. Graphical and tabular model comparison help to highlight this difference.
Step 1: Open the model explorer. Step 2: Look for the new version “CP.01.00 Create new customer 1.01” and the current version “CP.01.00 Create new customer 1.00”. Step 3: Select both model versions and use the feature “Compare” from the right-click context menu.
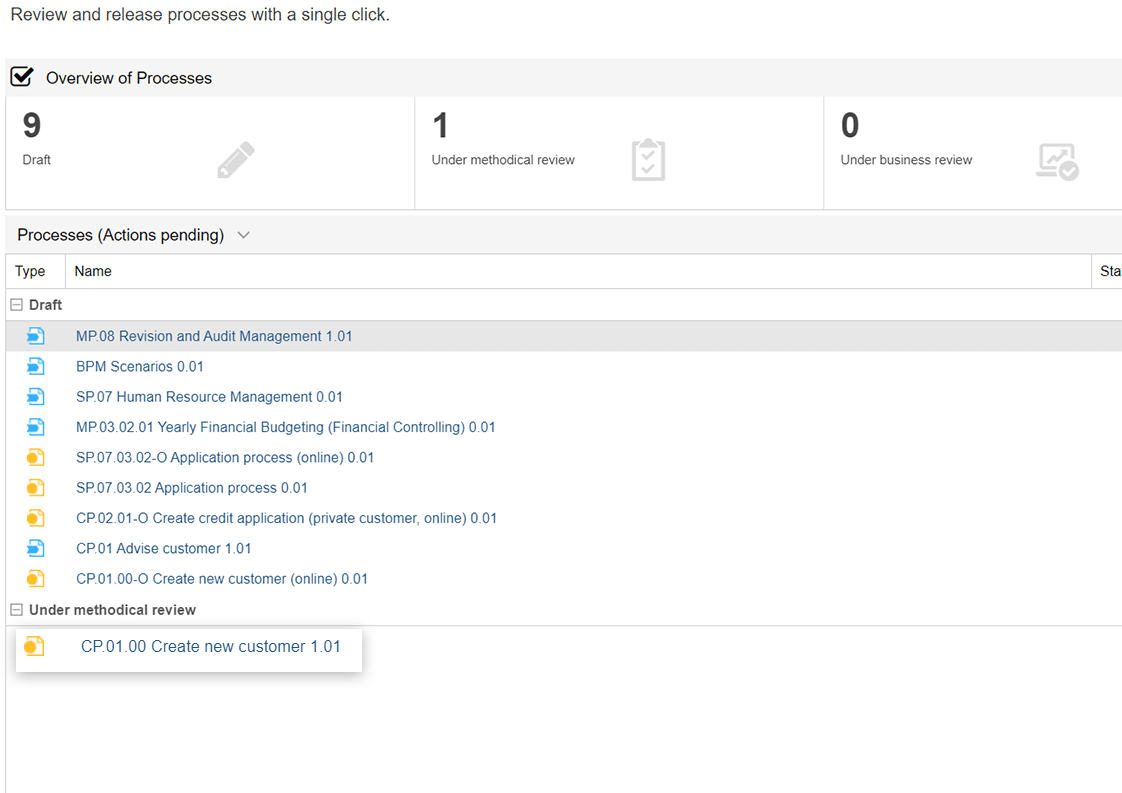
FORWARD THE NEW PROCESS VERSION TO THE RELEASE WORKFLOW
The new version of the „Create new customer“ process needs to be reviewed. The Process Release Workflow allows for a governed procedure to be followed, including a complete audit trail.
Step 1: Switch to the scenario “Control & Release” from the menu bar in the top-left corner of the screen Step 2: Review the model by clicking on it. Step 3: Go back to the main view of the scenario “Control & Release”. Step 4: Click on “Show actions” of the respective model and submit to the next state transition. Step 5: As process owner you can release the model after your business review.
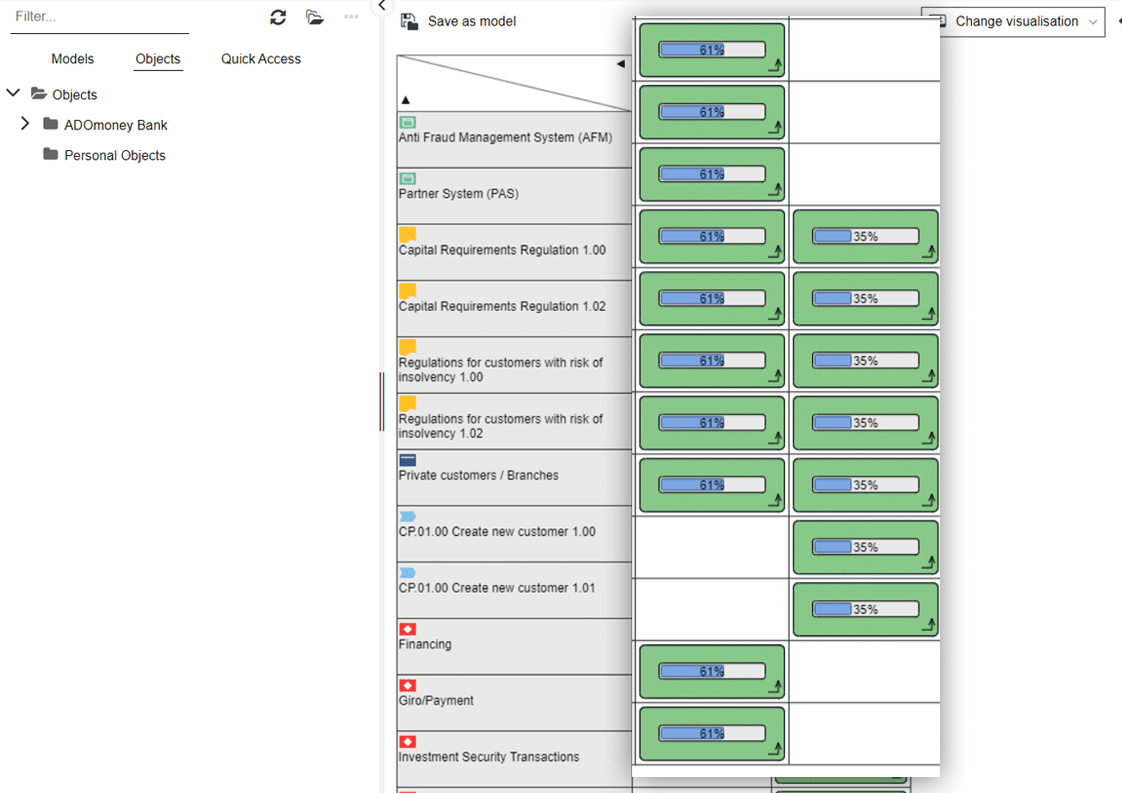
MONITOR THE PROGRESS OF THE INITIATIVE
The progress of the initiative needs to be monitored on an ongoing basis.
Step 1: Open “Find”. Step 2: search for “Creation of new customer”. Step 3: Mark the two objects “Creation of new customer: Add Know your customer (KYC) activities” and “Creation of new customer: Examine risk evaluation” of the object type “Initiative”. Step 4: Click with the right mouse button on the marked objects to open the context menu. Step 5: Select the function “Reports” and “Matrix”. Step 6: Select the configuration “Initiatives” and open. Step 7: Click the icon “Change visualisation” on the upper right-hand corner of the screen and select “Initiative progress”.